Monday, December 3, 2012

More Quilt As You Go

      I completed all the blocks for Rainbow Flower, but when I moved the blocks disappeared.  But it was so easy I may try it again.

     This is an 8" block, so cut batting 9" and backing 10".  Each strip finishes at 2" so I would cut 3" strips because I use a 1/2" seam allowance. 

     Position 2" yellow square at upper left corner.  Lay 2" pink square right sides facing over yellow square and stitch in place.  Open out.  Lay pink strip right sides together covering yellow and pink strip.  Cut off even with bottom of pink strip and stitch in place.


Continue adding strips until block is finished.


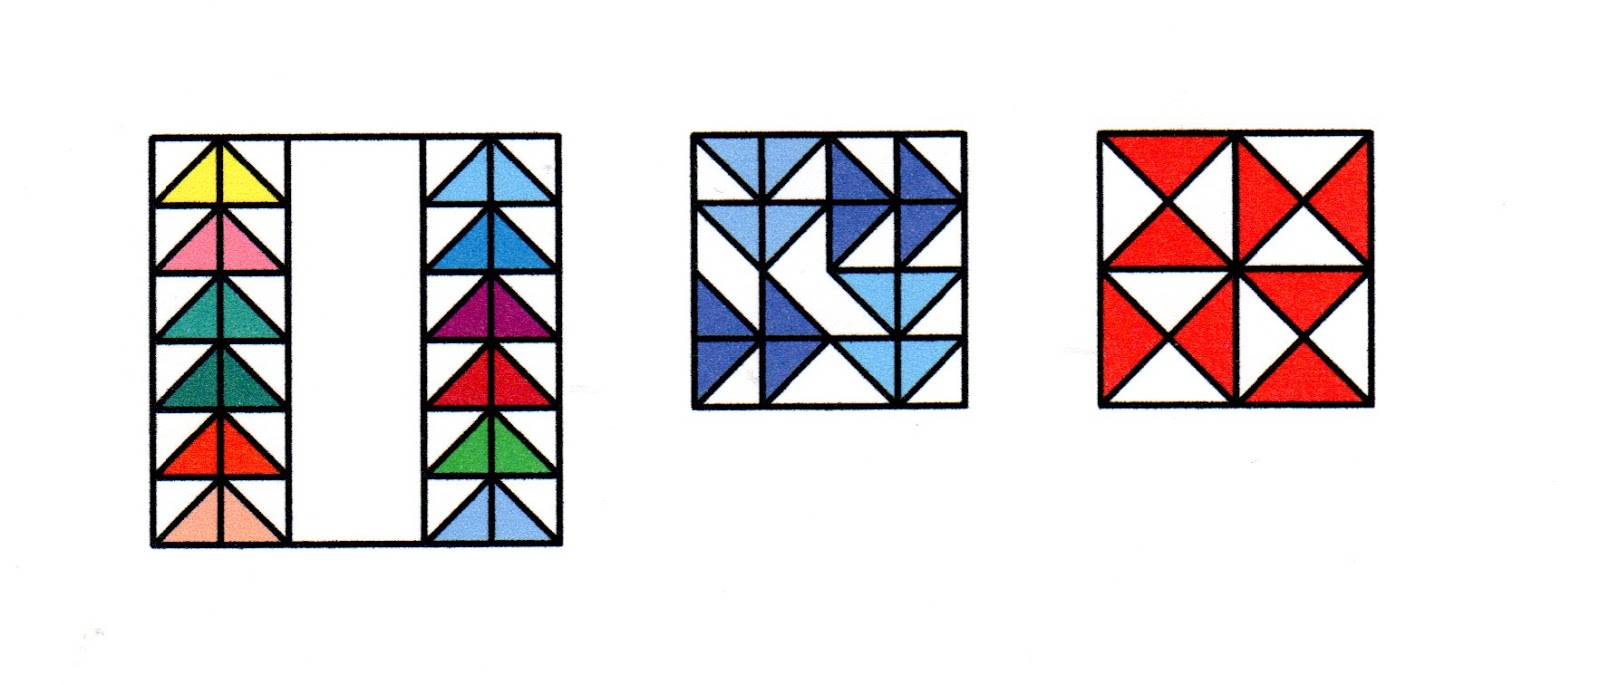
Below are other designs that can be used with this technique.


Half Square Triangles

     I am obsessed with triangles.  I mentioned before that I cut any leftover scraps into 2: triangles and toss them into a box.  I've decided to use up all those triangles and currently have six quilts in progress.


  For this I sorted the triangles into color groups.  Each block of 25 squares is a different color group.  I plan to set them with white lattice strips.


Half square trangles were made into pinwheels and set with plain white 4" squares.


I don't know the name of this pattern but the block finishes at 16".  It may look like quarter square triangles, but is three rows of half square triangles set on the diagonal and filled with a half triangle.
 

Lady of the Lake
 
Delectable Mountains
 
 
Designs for half square triangles are limitless.  Many regular patterns use them and are easily adapted to a scrap quilt, either by using scraps for each trangle or using color blocks separated by lattice strips or white squares.


Hey, those are quarter square triangles.  What are they doing here?  Well, I find that quarter square triangles are time consuming to piece and require too much effort to make sure they come out right.  By sewing together to half squae triangles, I now have a quarter square triangle that took only seconds to piece.  Try it, it is much easier.


Monday, October 29, 2012

This and That

I did it.  I finished one.  I'm so proud of me.


I'll grant you it is the smallest, but I finished it!
 
 
My second favorite hobby is gardening.  I have been trying to grow my own herbs for the past few years.  It's amazing how large one small starter plant can get.  The thyme plant I planted two years ago has spread to cover a three foot square.  I use it fresh during the summer and fall, but then I dry armloads for winter use.  With such a harvest, I needed something in which to store the dried herbs. 
      My husband loves Parmesan cheese sprinkled on his popcorn and I decided these wre ideal for storing the herbs.  I printed out labels, glued them onto the jara and viola, herb jars.


What I don't grow myself, I purchase in bulk.  I can buy 6-8 ounces of bulk herbs and spices for approximately the same cost as a 2 ounce jar.  The really nice thing about these jars is that they have a divided lid, one side large enough to spoon out the herb, the other side with holes in it for sprinkling.

     When I was in California visiting my daughter, I stumbled across large Folgers coffee containers.  I don't remember exactly how much coffee they contained, but I think about three pounds. They are the perfect size to hold 5 pounds of flour or sugar, and of course, I have one for coffee.


I use the smaller cans for things like brown sugar, rice, powdered sugar, you name it.  Since I put my borwn sugar in one of these containers, I haven't had any hard, dried out sugar.


Decorating the cans has limitless possibilities. There are three separate panels on each can.  For the brown sugar, I copied a picutre of a bear onto a grocery sack, with the label on a separate piece of paper.  For the popcorn, I copied an illustration for an ear of corn.  For the flour and sugar canisters, I copied my favorite recipes for the two side panels.  I really want one with a picture of Cookie Monster for a cookie jar but so far I haven't been able to copy a decent picture of Cookie Monster.

To make the labels, I scanned the desired pictures into a graphics program and sized it to the proper size.  After printing out, I sprayed each picture, front and back with a fixative.   This adds body to the paper and also helps prevent the ink from running.

Cut out the labels and glue in place on the cans.  Allow glue to dry then spray with a clear acrylic sealer.  This will make the labels water resistant so it's easy to wipe off any cooking spills

Wednesday, August 8, 2012

Quilts in Progress

  I have been busy the last few months.  I've completed four tops, now all I have to do is quilt them.


These are the two I gave instructions for   They went together really fast.

     I mentioned that when I bring a length of fabric home I cut off a 4" to 6" strip to use for scrap quilts.  I cut a lot of these into
triangles that will finish out at 2".  Here are some of the quilts I've made from those triangles.

Sawtooth


This is 4" Pinwheel blocks

Double Pyramid

     I learned the meaning of the saying "It's not a quilt until it's quilted" with this quilt.  I made this several years ago and thought it was really ugly.  I did quilt it with some elaborate fans and it was a thing of beauty.  It  became my favorite quilt.  But, alas, it succumbed to age and having used 100% cotton fabric.  Below are two examples of why I don't like 100% cotton fabric.


This oriinally had Holly Hobby cutouts appliqued to the blocks, most of which are now gone.  The background and lattice strips were cotton/polyester blends.


I showed a picture of this quilt previously.  All the patches around the blue triangles were once a red cotton, which has just disappeared.  The blue and white fabrics were a cotton/polyester blend.


This is a sampler I'm using for a beginning quilter's class.


This was how I used the leftover fabric.


I made two of these 32" blocks.  I love how it turned out, but I don't have any more of the blue fabric and I can't figure out what to do with the two blocks.  Any suggestions would be welcome.


Monday, August 6, 2012

A quick note

     I want to take a minute to apoligize for not posting recently.  I am a complete idiot when it comes to working on the internet.  I tried to access my blog but forgot my password.  Not an unusual occurance for me.  I tried to get my password from whoever is in charge of this function, but I just couldn't read those sqiggly little messages.  I finally e-mailed and was told someone must have been playing with my blog but I wasn't clear on what I was suppsed to do about it.  Anyway, I finally tried again and will be posting more quilts in the next few days.  I also have a craft project you might like.

Sunday, April 22, 2012

Old Quilts

I  wanted to show you that I do occasionally finish a quilt, right down to the quilting.

     I made this stenciled quilt in 1981.  I do think the 12" blocks look better than the 14" ones I used in my more recent version.


        I don't know what happened to this quilt, but the last time I saw it it had not faded in the least, which I must admit, surprised me.


     I made this quilt in 1986 to practice my machine quilting.  Each block has a different design.  Unfortunately, most of the cotton patches have disappeared, but the quilted blocks remain intact because I used poly/cotton for the blocks.


      I found a picture of the Wheel of Fortune quilt I gave in my first blog.  I'm not really happy with the border so I'm going to replace it with a Prairie Point border.  I think it will dress it up really nice.

Tuesday, March 27, 2012

Quilt As You Go - Joining the Blocks

1.  Fold batting and backing back from seam line.  Pin if desired.

2.  Join two pieced blocks together.  Continue joining blocks in rows as wide as required.

3.  Trim batting even with seam line.  Trim backing on right hand side to slightly overlap seam line. 

4.  Bring backing from left side to cover seam and edge of batting/backing.  Fold under seam allowance and pin in place. 

5.  Sew down the edge either by hand or machine. 

6.  Join rows together in the same manner.

     I like to finish the back by laying lattice strips over the seams.

     The finishing by this method is time consuming so I have adapted the concept.  I divide the finished top into quarters and quilt each quarter.  This makes it easier to manipulate in the machine without having to fight the weight of the entire quilt.  After quilting all four quarters, I then join them together as above.

     My only problem with this method is that I am so anxious to see the finished top I join it together just to look, then I have to go back and rip out the seams to do the quilting.  I guess I need to learn patience. 

Monday, March 12, 2012

The Frustrations of Quilting

     I've told my students over the years that the fabric is out to get me and this past two weeks has proven my point.  Well, not just the fabric but my mindless pursuit of my hobby.
     I started both of the quilts I posted a coule weeks ago, the red ones.  The one with the stars is coming along nicely.  Everything is falling into place just as it should.  The other one, however, Tree Everlasting, is a different kettle of fish.
     I was determined to make these two quilts perfect.  I drew every cutting line and marked every seam line.  The sewing went perfectly.   I completed the first row of 25 half square triangles, added the plain strip and then went to add the second row of half square triangles.  Guess what?  The second row took 26 half square triangles.  Okay.  I fixed that.  Then I began sewing more half square triangles.
      My sewing machine is set up so that the needle rests to the left of center and I have to select the stitch I want to use.  I keep forgetting this and after sewing about 50 half square triangles I noticed that the seam line was set left of center.  So I had to go back. rip out every one of the squares and resew them.
     I decided I needed a break from this so I went back to finish a Pinwheel I had started a couple of years ago.  Don't you know I did the exact same thing again, twice.  So instead of making progress on these quilts I've spent most of my time ripping seams and resewing them.  
     I'm not giving up.   I only have five more rows or 21 blocks to finish this quilt, and I am going to finish it.
      I think I mentioned that I cut leftover pieces into triangles that will measure 2".  I have a whole box full of these and I chose to try to use up all these scraps  As I'm nearing the end of the quilt, I noticed that it makes a great history of fabric.  The fabrics range from the 1970's through last year.  Unfortunately, I haven't made a very big dent in the box.  I've already finished two tops using this stash, and  I have two others in various stages of finishing.  I'm also trying to design a medallion to use up even more.  Maybe someday I'll use them all.

Monday, March 5, 2012

Quilt As You Go

     I think I've made it clear that my least favorite part of quilting is the actual quilting so I jumped on the quilt as you go method as soon as I saw it.

    The original method was to quilt each block as you completed it.  Then you set the blocks together as they are finished.  Which creates the problem of setting all those blocks together neatly.  I've adapted this method by dividing the quilt top into quarters, quilting each quarter, then setting them together in the final quilt.  This makes it easier to manipulate the quilt through the machine.

     A second quilt as you go method is to quilt as you piece the block.  I like this method even though I have the setting the blocks together at the end problem, which I will cover in my next blog.

      This block has several names, Economy, Hour Glass, This and that, Thrift Block and Shoofly, all of which indicate a scrap quilt.  I would make this a 6" or 8" block.  Once you have decided on block size, cut a square of batting 1" larger and a backing square 2" larger than the finished block.  Mark as shown below to find center for aligning first patch.

     Position the center square on the batting/backing square.  Lay the uppper left half square triangle, right sides together, over the center square.  Stitch in place.  Open out and position upper right triangle in place, right sides together and stitch.  Continue around the square until all pieces are sewn.  The block is done.

Important:  Do not stitch beyone the seam line.  The seams must be left free in order to join the blocks together.


          Although I haven't tried it, I think this method could be adapted to paper pieced quilts.

Wednesday, January 25, 2012

Tree Everlasting

The patterns

Well, I thought I could add a page for the patterns, but I can't find it.

Fireworks - the layout is five rows of the star shape with five stars in each row.  These are offset by solid red strips.  The quilt is
76" x 82" and finished off with a white border 6" to 8" wide.


Tree Everlasting

  I have a love/hate relationship with my computer.  And they hate me.  I bought my current computer within the last year and I've already had to take it in for repairs.  So I've been without one for the past two months.

Anyway, I decided that since I've never made a red and white quilt now was the time.  So I trot off to the fabric store and select my fabric.  Since it's two solid colors I can buy broadcloth, my favorite.  This is usually on sale for $1.99 a yard, but this time I paid full price, $4 a yard, spending $32.  And this is the cheapest fabric in the store.  I think I'm glad I've been making scrap quilts and using up my stash. With most fabric at $8 a yard, I don't think I could afford to make quilts any more, at least not paying full price.  The fabric has got to be on sale.

There are other sources of fabric.  Early quilters used old clothing for quilts.  I've found rummage sales a great place to look for cheap sources of fabric.  In fact, I am making a quilt using old shirts from my husband and sons. Shirts are usually good quality fabric and in my house, they're been outgrown, not worn out.  I chose the pattern Farmer's Daughter and I can cut four or five blocks from each shirt.   If you have daughters, their old skirts and blouses are excellent sources of fabric.

Any type of fabric can go into an everyday quilt as long as you keep the weights the same.  I've made a few denim quilts, as well as those using my son's old baseball T-shirts.  Old draperies and sheets are worth exploring as well. 

I'm going to see if I can get two quilts from the fabric I bought.  The first one I'm calling Fireworks since there wasn't a name attached to the picture.  The original quilt was made in 1880 and I thought it was quite striking.  Since I hate working with quarter square triangles, I converted all the star points to 1/2 square triangles.

The second one, I think is called Tree Everlasting   I have a picure of this quilt and the strong graphic design just calls to me.  This one should be very easy since it is nothing more than 1/2 square triangles and long strips. Both quilts were finished with a wide white border.   Hope you enjoy them.